How to create Custom Events in JavaScript?
Creating Custom Events in JavaScript

I’m Madhu Saini, an Open-Source Enthusiast, Full Stack Developer and a learner from India. I love helping people and promoting Open Source. I create content on
- JavaScript
- Web Development
- Public Speaking
- GitHub
- Open Source
Imagine you're building a complex web application. Pre-built events like "click" and "submit" are great, but what if you need something more specific? This is where custom events come in - a way for your JavaScript code to create and fire its own events, allowing for more nuanced communication between different parts of your application.
Understanding Events in JavaScript
Before diving into custom events, let's first grasp the concept of events in JavaScript. Events are actions or occurrences that happen in the browser, triggered by either user interaction (like clicks, mouse movements, or keyboard inputs) or by the browser itself (like page load, resize, etc.). JavaScript provides a robust event handling mechanism to capture and respond to these events.
Why Custom Events?
While built-in events handle common interactions, custom events offer advantages:
Specificity: They signal unique actions within your application. Imagine an "itemAdded" event for a shopping cart or a "levelCompleted" event in a game.
Decoupling: Code that creates events (like a form submission) is separate from code that listens for them (like updating a progress bar). This improves code maintainability.
Data Transfer: You can attach custom data to events using the
detailproperty, allowing informative messages to be passed along.
Built-in vs. Custom Events
JavaScript comes with a set of built-in events that cover common interactions. However, there are scenarios where these predefined events might not suffice. This is where custom events come into play. Custom events enable developers to define their own event types, extending the capabilities of event-driven programming in JavaScript.
Creating a custom event involves a few key steps:
Event Initialization: First, we need to initialize a new custom event using the CustomEvent constructor. This constructor takes two parameters: the event type and an optional object containing any additional data to be passed along with the event.
// Create a new custom event
const customEvent = new CustomEvent('customEventType', {
    detail: { key: 'value' } // Optional additional data
});
Dispatching the Event: Once the custom event is initialized, we can dispatch it on a specific DOM element using the dispatchEvent() method.
// Dispatch the custom event on a DOM element
document.dispatchEvent(customEvent);
Subscribing to Custom Events
To respond to custom events, we need to add event listeners to the target elements. Event listeners "listen" for a specific event type and execute a function when that event occurs.
// Add an event listener for the custom event
document.addEventListener('customEventType', function(event) {
    // Event handling logic here
    console.log('Custom event triggered with data:', event.detail);
});
Practical Example: Custom textSelect Event
Let's illustrate the concept of custom events with a practical example. Suppose we have a text in our web application. We can create custom events which fires whenever the user makes a selection of our text in our web app.
<!DOCTYPE html>
<html lang="en">
<head>
<meta charset="UTF-8">
<meta name="viewport" content="width=device-width, initial-scale=1.0">
<title>Text Selection Event</title>
</head>
<body>

<p>Select some text in this paragraph to trigger the event.</p>

<script>
// Event Initialization: Listen for selection changes
document.addEventListener('selectionchange', function() {
    const selection = window.getSelection().toString();
    if (selection) {
        // Dispatching the Event: Dispatch custom event with selected text
        document.dispatchEvent(new CustomEvent('textSelect', { detail: { selectedText: selection } }));
    }
});

// Subscribing to Custom Events: Subscribe to the textSelect event
document.addEventListener('textSelect', function(event) {
    // Log the selected text to the console
    console.log('Selected text:', event.detail.selectedText);
});
</script>

</body>
</html>
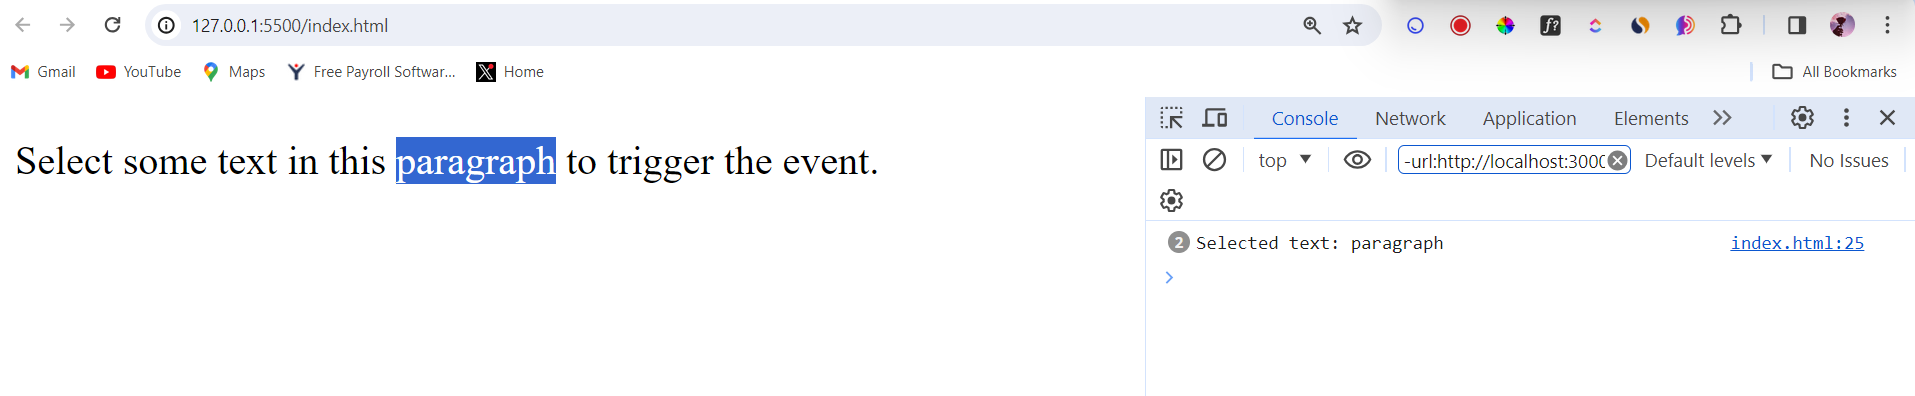
So, copy this code and run the live server in your code editor. And in the local server open up your developer tools and that should look something like this -

So, when I've tried to select the text by double clicking on this, our custom event triggered and you can see the log in the developer tools right side.
Hurray!🥳 You've created your first custom event. Now go forth and build something amazing!
Conclusion
While JavaScript doesn't natively support a textSelect event, we can simulate it by combining existing events and JavaScript logic. By creating a custom textSelect event, we open up possibilities for enhancing interactivity and providing richer user experiences on the web. Whether it's highlighting selected text, triggering actions, or gathering insights, the textSelect event can be a valuable addition to your toolkit as a web developer. Happy coding!
To read more about tech, web development & open source, you can follow me on Hashnode and Twitter (@MadhuSaini22) and If this blog helped you in any way then you can sponsor my work and show love and support.
Thank you so much for reading! 👩💻


